Ticket Count Plug-in
The ticket count plug-in adds a window to the bottom of the following event pages:
- Ticketmaster / Livenation
- AXS
- Stubhub
- Vivid Seats
- ATG (nly broadwaysf.com and broadwayindetroit.com are supported at the moment)
that does it’s best to summarize the inventory for the event you’re currently viewing.
Ticketmaster / Livenation
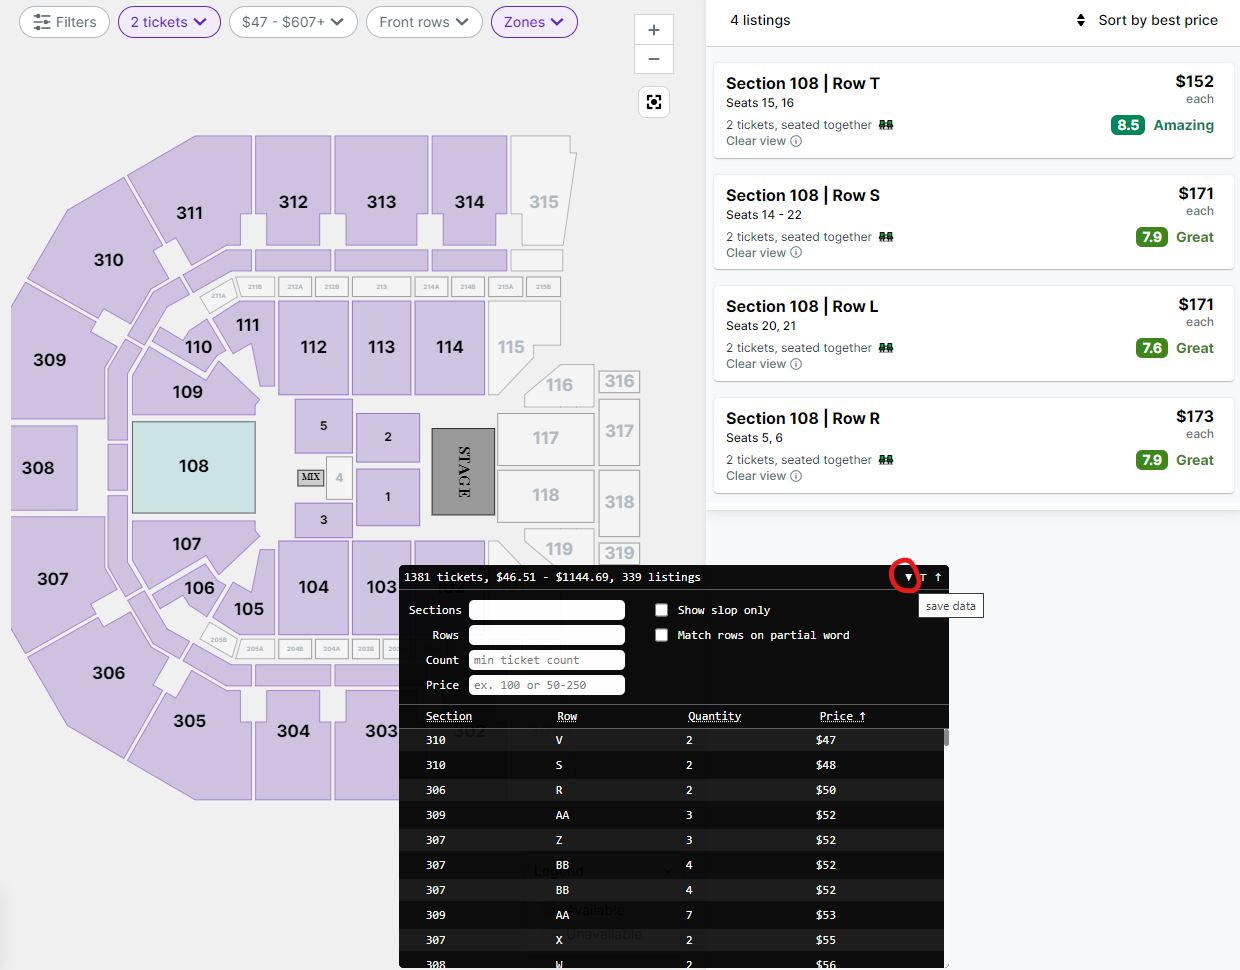
For Ticketmaster and Livenation, the ticket count plug-in presents itself as a window broken into two sections.

The top section breaks down all seats by seciton, price, and offer unlesss the Group offers option is checked, in which case each seat is broken down by section only and the price range and number of offers per section is summarized.
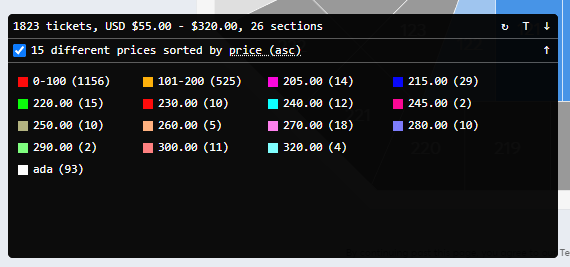
The bottom section is the map shader.
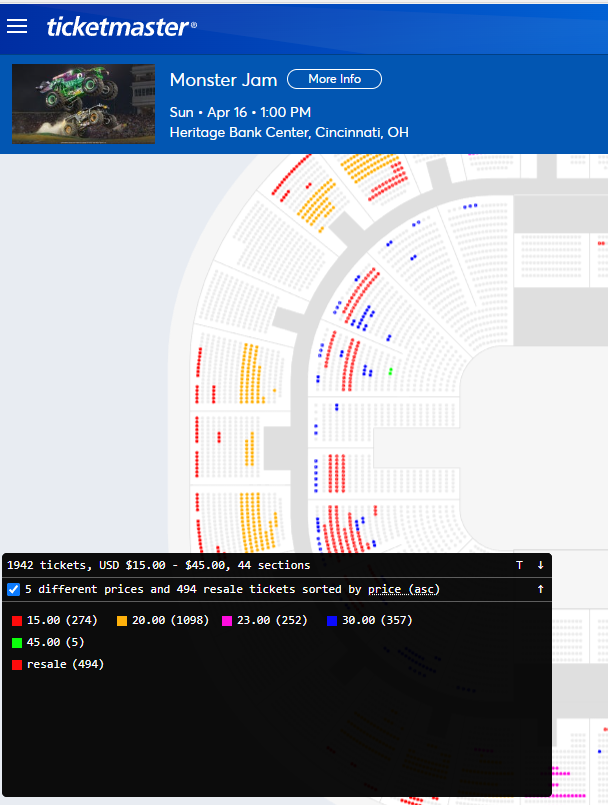
The map shader works by assigning a color to each primary price point. There are 16 total colors. If an event has more than 16 unique prices points for primary inventory, the colors will repeat. Resale inventory is assigned it’s own unique color. There are also settings that let you filter out offers on primary inventory based on keywords and ADA inventory can also be assigned it’s own unique color.
You can toggle the map shader on or off with the checkmark right above the color buckets.
The map shader is interactive. Clicking on a bucket will turn on filtering mode that only shows the seats matching the currently selected buckets. 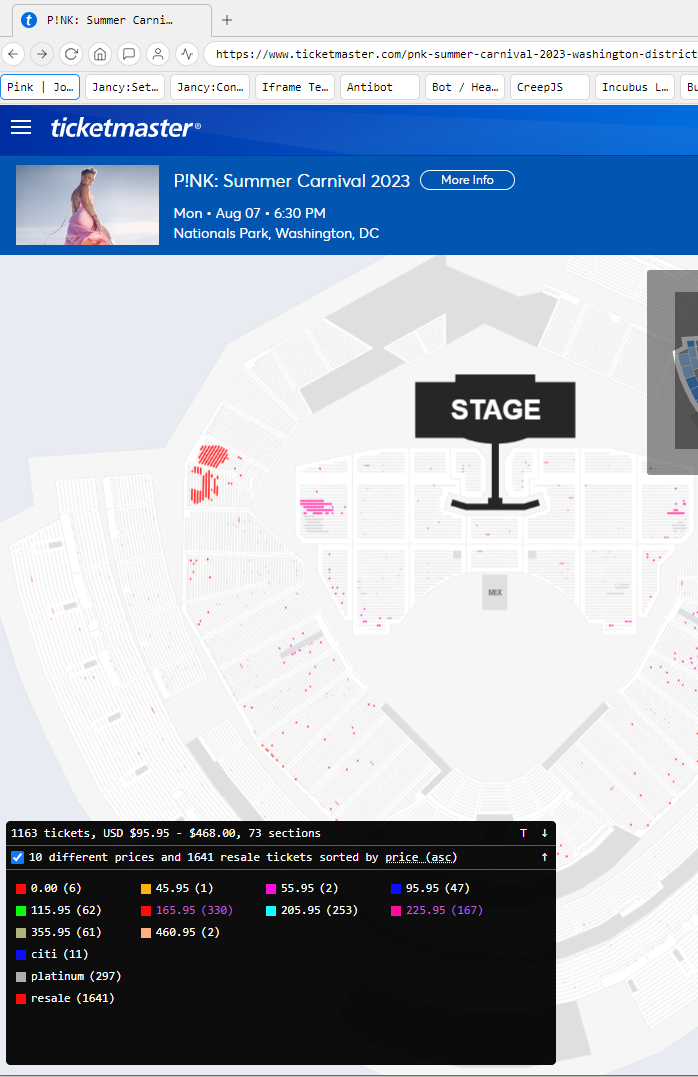
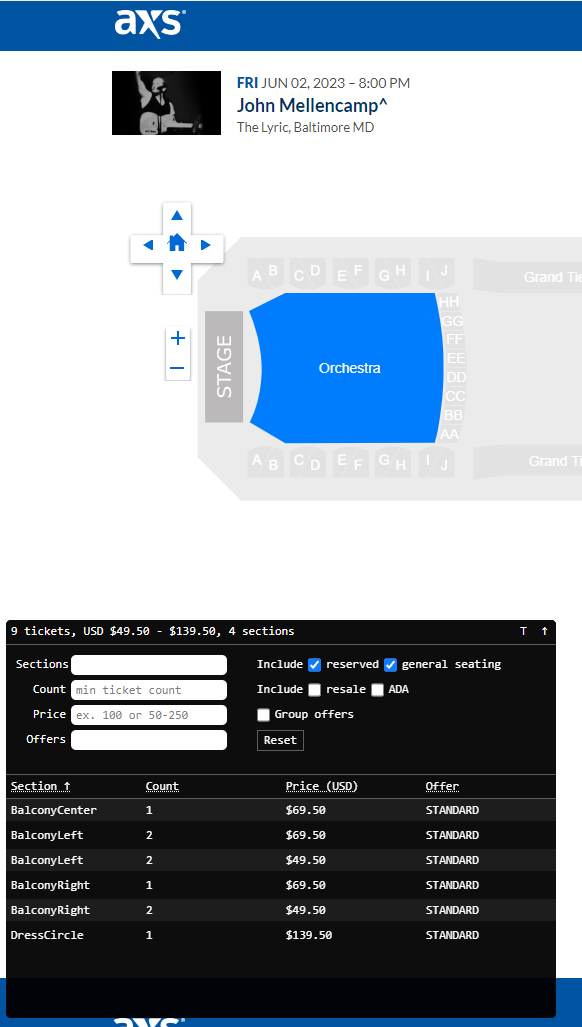
AXS
For AXS the ticket count plug-in will summarize counts by section broken down by price and offer unless the Group offers option is checked, in which case each seat is broken down by section only and the price range and number of offers per section is summarized.
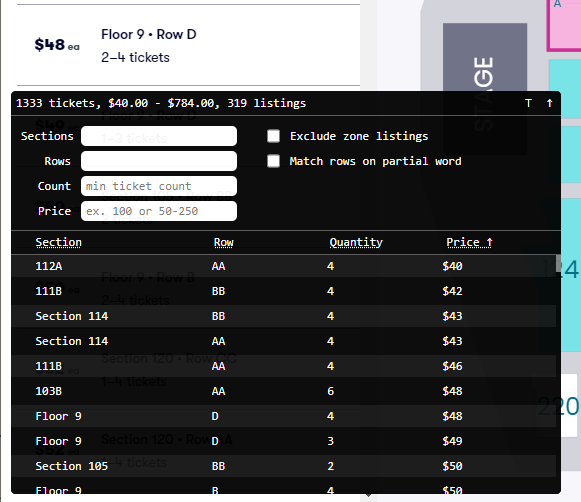
Stubhub / Vivid Seats
For Stubhub and Vivid Seats the ticket count plug-in will summarize all the listings and it provides some simple controls for filtering listings.
Settings
The ticket count plug-in can be configured via the Ticketcounts settings panel.
Sites
These checkboxes configure which sites to enable the ticket count plug-in on. If a site isn’t checked the ticket count window won’t show up.
Default Window Settings
Don’t refresh data automatically (TM only)
If this is checked, the ticket count window will start without data in it and you’ll have to press the refresh button to get the data.
This setting only applies to TM at the moment.
Primaries start enabled
If this is checked, the ticket count window will start minimized on Ticketmaster and AXS (when it works again).
Secondaries start minimized
If this is checked, the ticket count window will start minimized on Stubhub on Vivid Seats.
Primaries start in extra large mode
If this is checked, the ticket count window will start in extra large mode (300 extra pixels high) on Ticketmaster and AXS (when it works again).
Secondaries start in extra large mode
If this is checked, the ticket count window will start in extra large mode (300 extra pixels high) on Stubhub and Vivid Seats.
Start with map colors enabled (TM only)
If this is checked, the ticket count window will start with the map shader turned on on Ticketmaster.
Start with map colors minimized (TM only)
If this is checked, the ticket count window will start with the map shader portion only minimized on Ticketmaster.
Start with all in pricing enabled (TM only)
If this is checked, the ticket count window will display all in prices (prices include fees) by default on Ticketmaster.
Reverse the min/max buttons
If this is checked, the buttons to minimize and maximize the various panels of the widget will be reversed.
Ticketmaster Window Settings
This setting lets you to select the location of the ticket count box on Ticketmaster event pages. You can choose from the four corners of the browser window. Additionally, you have the ability to adjust the x and y offsets from the edge of the browser window.
This setting is limited to changing the location of the ticket count box on the Ticketmaster website only. It does not function on other sites that use the ticket count plug-in.
Ticketmaster and AXS Default Filter Settings
These are the default filter settings the ticket count plug-in will use the first time you visit a new Ticketmaster or AXS event.
Ticketmaster Map Colors
Color 1 - Color 16
These are the 16 colors the map shader will use to assign colors to price points
Resale color
This is the color that will be assigned to resale inventory. If there is any resale inventory for the event it will be assigned the color specified and a
resalecolor bucket will show in the window.Price Ranges
An optional comma-delimited list of price ranges (
lo - hi) that will be used to assign colors to tickets on instead always assigning a color based on primary price point.If you want all primary inventory that falls within the price range of 0 to 100 to be assinged the first color and all tickets priced between 101 - 200 to be assigned the second color, you’d use the following format
0-100, 101-200. Any inventory that doesn’t fall within a defined range will get assigned a color as it would normally.
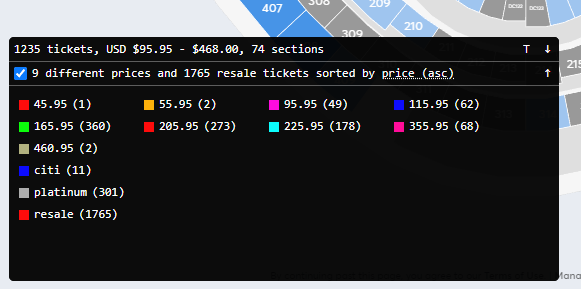
Offer keywords
A comma-delimted list of keywords that will be used to filter offers on a seat by. If any keyword matches an offer assigned to the seat, it will be assigned the color specified and a new color bucket called
offerswill show in the window.If you want any seats with the word
platinumandvipin their offer to have a custom color you’d set this value to beplatinum, vip.You can break offers out into their own color buckets using the following format:
platinum:#ababab, citi:blue. Any seat that has an offer that matches a keyword with an assigned color will get it’s own color bucket based on the keyword and will get assigned the color specified.Description keywords
A comma-delimted list of keywords that will be used to filter seats by descriptions. If any keyword matches any part of any of the descriptions assigned to the seat, it will be assigned the color specified and a new color bucket called
descwill show in the window.If you want any seats with the word
warningin their descriptions to have a custom color you’d set this value to bewarning.You can break descriptions out into their own color buckets using the following format:
warning:#ababab. Any seat that has a description that matches a keyword with an assigned color will get it’s own color bucket based on the keyword and will get assigned the color specified.Color ADA seats separately
If checked, ADA seats will be assigned the color specified.
Vivid Settings
Note keywords
A comma-delimted list of keywords that will be used to filter notes on a listing by. If any keyword matches a note assigned to a listing, it will be assigned the color specified.
Data Capturing
Ticketmaster: Enable seat data saving
If checked, the ticket count window will do the work necessary to make seat level data available for saving to disk.
The files generated will be named
<event_id>_<timestamp>_<unique_id>.csvwhere:
event_idis the TM assigned event IDtimestampis the number of seconds past January 1, 1970unique idis the based off theSeat data filename unique IDsetting belowThe format of each line of the file will be:
id, section, row, seat, price, event, venue, date, urlSeat data output folder
This is the directory generated files will be saved to.
Seat data filename unique ID
This is a special value that will be used as one of the components of the seat data filename.
If left blank, a random number between 1 and 1000 will be used for each file.
Autosave seat data on load/refresh
If checked, a seat data file will be generated automatically every time new event level data is retrieved and displayed.
Write subsequent files for the same event only when counts change by at least X seats or when Y seconds has elapsed since the previous file was written.
Allows you to control how frequently new files are written for the same event accounting for changes in quantity (X) or elapsed time (Y).
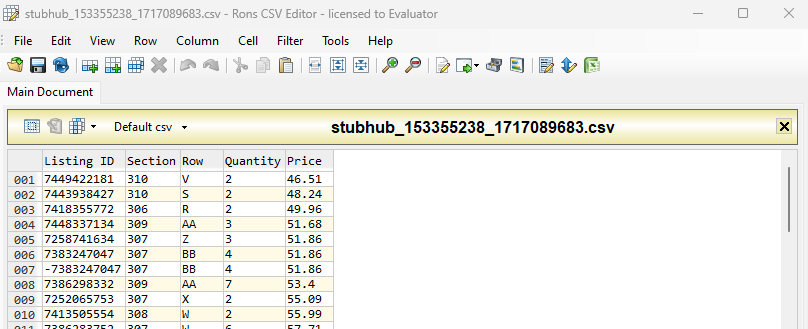
Stubhub: Enable listing data saving
If checked, the ticket count window will do the work necessary to make listing data available for saving to disk.
The files generated will be named
<event_id>_<timestamp>_<unique_id>.csvwhere:
event_idis the SH assigned event IDtimestampis the number of seconds past January 1, 1970unique idis the based off theSeat data filename unique IDsetting belowThe format of each line of the file will be:
listing id, section, row, quantity, priceListing data output folder
This is the directory generated files will be saved to.
Listing data filename unique ID
This is a special value that will be used as one of the components of the listing data filename.
If left blank, a random number between 1 and 1000 will be used for each file.
Autosave listing data on load/refresh
If checked, a listing data file will be generated automatically every time new event level data is retrieved and displayed.
Write subsequent files for the same event only when listings change by at least X listings or when Y seconds has elapsed since the previous file was written.
Allows you to control how frequently new files are written for the same event accounting for changes in listings (X) or elapsed time (Y).
Vivid Seats
The save data feature lets you save listing data from Vivid Seat event pages to disk. To use this feature, make sure you have ticket count enabled for these sites in the sites section of the TicketCount plug-in page (File -> Settings -> TicketCount). Also, ensure you have the TicketCount plug-in enabled in the plug-ins settings page (File -> Settings -> Plug-ins).
-
You can save the data by first clicking on the save data button in the ticketcount window when on an event page(Either Vivid Seats or StubHub).
-
After clicking the save data button, a window will open where you will be able to name and save the file to disk.
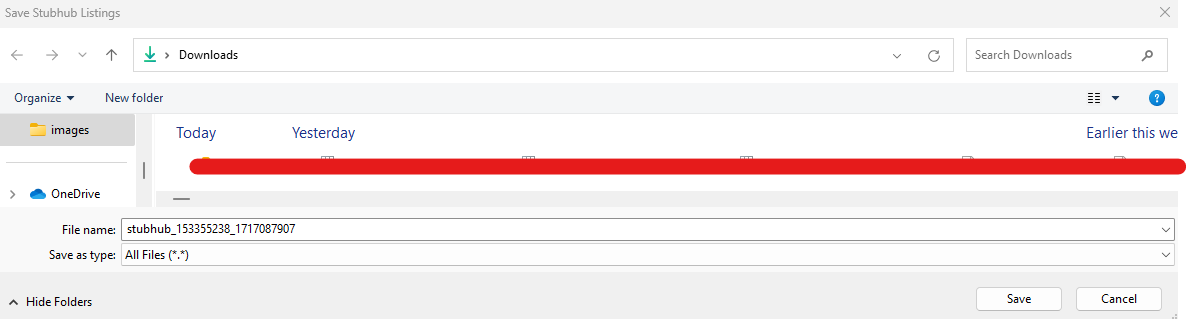
-
The saved data will be formatted into a CSV file with information like Section, Row, Price, etc.