Optional Columns
This section builds on the previous one, which discussed the required columns for creating a profile CSV to be used in Jancy. There are many optional columns you can utilize, depending on your needs.
As mentioned in the previous section, the columns do not need to be in any specific order; Jancy parses them by column name, not by order. However, it’s crucial that the column headers are formatted correctly for Jancy to recognize them. These headers must match exactly what is shown below, as they are case sensitive. If you omit an uppercase letter, for example, the parser will not recognize the column.
Group
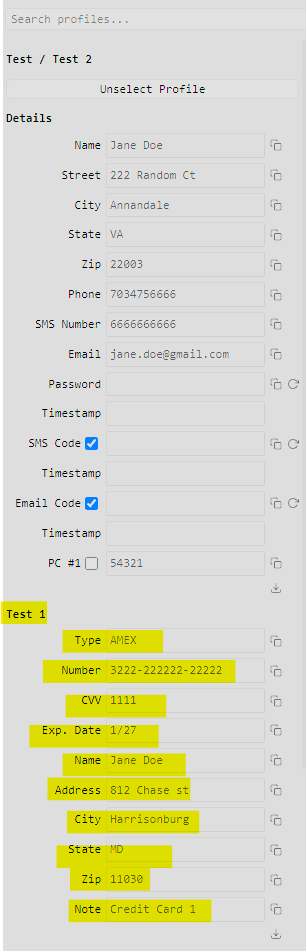
The “Group” column allows you to separate your profiles by group, making it possible to group related profiles together. This feature can be particularly useful when used in conjunction with the tab management system, as it allows you to open entire groups of profiles in separate tabs. The following is the format for the column header.
If you don’t provide this column or you do but leave it blank, Jancy will use the name of the provider as the group name for the profiles.
- Group
The example below will feature the “Group” column first, but as stated above, the columns do not need to be in any particular order.

The following snapshot will show where the group will be displayed on the profile panel.
If multiple providers added to Jancy have identical group names, the group name in the first provider will remain unchanged. For subsequent providers, Jancy will modify the group names by appending the provider’s unique identifier in parentheses.
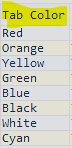
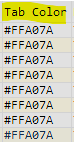
Tab Color
The “Tab Color” column lets you assign a color to your tab when a profile is selected. You can specify the color using either color names or hex codes, a list of these can be found here. The following is the format for the column header.
- Tab Color
The example below will show what these columns should look like in your profile CSV.
The following snapshot will show where the color will be displayed on the tab.
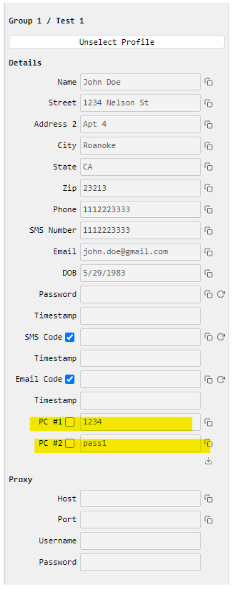
Personal Address
These columns allow you to add an address to a specific profile, separate from the billing or credit card address. The following fields can be added to your personal address, each having its own separate column. It’s worth noting that you can pick and choose these columns according to your specific setup.
- Address : This is the street address
- Address 2 : Street address line 2
- City : The city associated with the address
- State : The state associated with the address (The state must be formated as an abreviation of the state you would like to input. (e.g VA or NY))
- Zip Code : The zip code of the address
One thing to note is that you may not want to use all of these fields, and that’s okay. Pick and choose the ones that work best for your setup. For example, if you only want “Address,” “City,” and “State,” just add those columns to the CSV and leave the rest out. Alternatively, if you don’t want any of these fields, you can omit them entirely, as they are not required.
The example below will show what these columns should look like in your profile CSV.

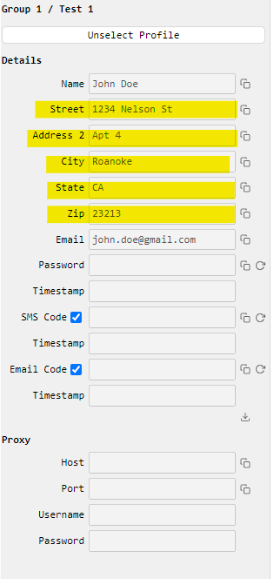
The following snapshot will show where the personal address will be displayed on the profile panel.
Date Of Birth
You also have the option to add a “Date of Birth” field to your profile CSV if needed. However, it’s not necessary to include this field if you don’t want to. The following describes the format of the column header.
- DOB : The contents of this field must be formatted as follows: MM/DD/YYYY (e.g 5/29/1983).
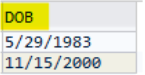
The example below is what the date of birth field should look like in your profile CSV.
The following snapshot will show where the date of birth will be displayed on the profile panel. 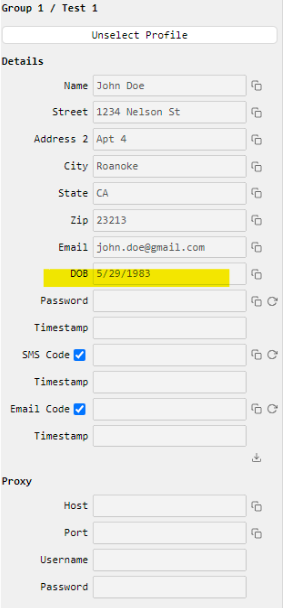
Phone Number
The “Phone Number” column can be used to associate a phone number with the profile. Note that this column is not used for retrieving SMS codes; that will be covered in the next section about the “SMS Code” column. The following describes the format of the column header.
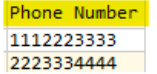
- Phone Number : The accepted formatting for the phone number field is either a 10-digit number (e.g., 1112223333) or a number with dashes (e.g., 111-222-3333). If you add a country code, such as “1,” at the beginning of the number, Jancy will automatically remove it when parsing the profile.
The example below is what the phone number field should look like in your profile CSV.
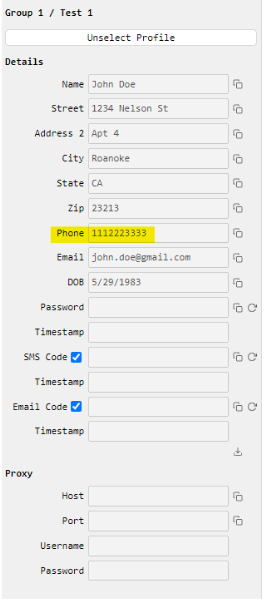
The following snapshot will show where the phone number will be displayed on the profile panel.
SMS Number
This column allows you to add an SMS number that is associated with the profile. Note that this field does not populate SMS codes; rather, it is used to interface with 2FA providers. The following describes the format of the column header
- SMS Number : The format of the phone number is 10 digits (e.g. 9998887777).
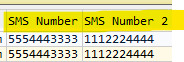
The example below is what the sms number should look like in your profile CSV.
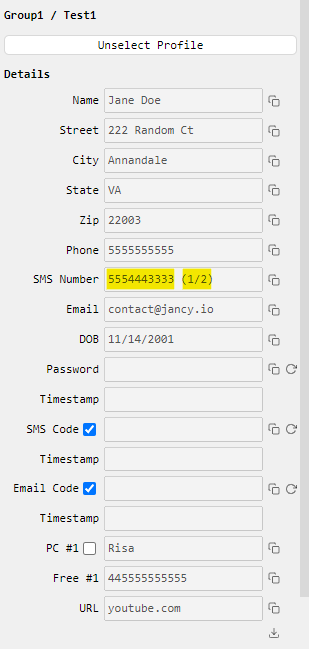
You can include multiple “SMS Number” columns if needed. To differentiate between them, simply change the text following “SMS Number”. The order of the numbers in Jancy is based on thier position in the file, Jancy reads the fields from left to right. In the profile panel, you will see the current number and also which number in the list you are viewing. To cycle to the next SMS Number, run the command “Select next SMS number from profiles in all selected tabs”.
You can add country codes to your “SMS Number” if needed. They can be added directly in the cell or in the column header. Currently Jancy only support the +1 and +44 country codes (You’ll want to leave out the “+” when formatting the cell/header). The screenshot below goes over how this can be used in your file.

The following snapshot will show where the SMS number(s) will be displayed on the profile panel.
Passcodes
The “Passcode” field allows you to add profile-specific passcodes, such as Verified Fan codes, Presale Codes, etc. This field is quite versatile and can be used to add any codes or items you’d like. It’s important to note that this is different from the “Password” field, which will be covered in the “Resolvers” section of the file format documentation. The following describes the format of the “Passcode” column header.
- Passcode
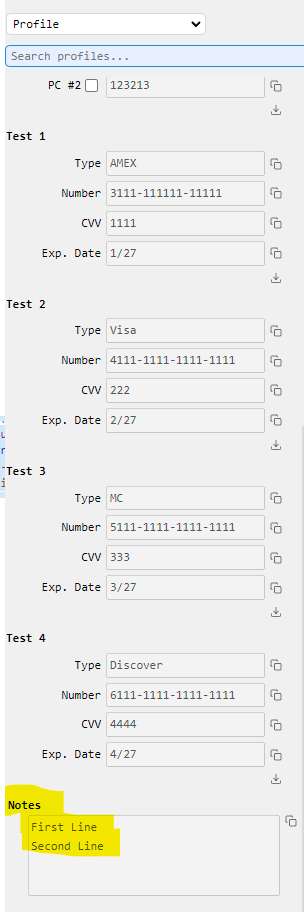
You can include multiple “Passcode” columns as needed. To differentiate between them, simply change the text following “Passcode.” Jancy reads the passcode fields from left to right. For example, even if you label the first passcode field as “Passcode3,” it will appear as PC #1 in the profile panel. Below is an example of what this would look like.
- Passcode2
The example below is what the passcode column header should look like in your profile CSV
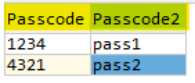
The following snapshot will show where these passcodes will be displayed on the profile panel.
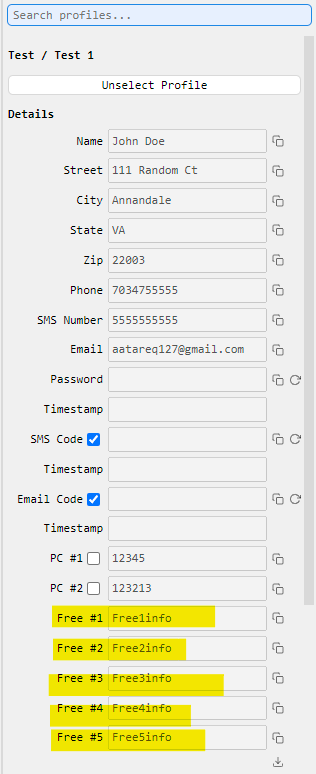
Free Columns
The “Free” columns in Jancy offer flexibility by allowing you to store any desired information. Each profile CSV can contain up to 10 free columns. Additionally, if you want to configure autofill to populate specific fields on a web page, you can reference these columns in your autofill map file. For further guidance on managing the autofill map file, please refer the autofill map documentation here. The following describes the format of the column headers for the free columns.
- Free 1
- Free 2
- Free 3
- Free 4
- Free 5
- Free 6
- Free 7
- Free 8
- Free 9
- Free 10
In order for these columns to be parsed correctly the formatting must follow what is shown above. These headers are case sensitve so the “f” in free must be capitalized. Additionally, there must be a space between the word free and the number of the free column.
The example below is what the “Free” column headers should look like in your profile CSV

The following snapshot will show where these columns will be displayed on the profile panel.
Persist Cookies
The “Persist Cookies” column allows you to enable or disable the saving of cookies for each profile. Note that this feature is still experimental and may not always work or could have unintended side effects. If you have any questions regarding the use of this feature, please contact us at contact@jancy.io. The following describes the format of the “Persist Cookies” column header.
- Persist Cookies : There are 2 possible values that can be entered in this field.
- 0 means don’t persist cookies (this is a zero not the letter o)
- 1 persist cookies
Any other value or an empty value will cause the profile to honor the global Save and restore cookies setting.
The example below is what the persist cookies column header should look like in your profile CSV.
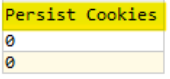
There is no displayed information of persist cookies in the profile panel.
Persist Sessions
The “Persist Sessions” column allows you to enable or disable the creating of persistent on-disk sessions for each profile when creating a tab with a profile selected in to it.
- Persist Sessions: There are 2 possible values that can be entered in this field.
- 0 means never create a persistent session for this profile
- 1 means always create a persistent session for this profile
Any other value or an empty value will create the tab based on whatever the local setting is set to. For the new tab custom dialog, that means the session will be created based on the state of Use persistent disk-based sessions for the created tabs checkbox.
This feature is a work in progress and might change in functionality in future releases. Also, it’s possible that the use of this feature in conjunction with Jancy’s cookie persistence feature might cause unintended side effects.
Buyer
The “Buyer” column is a comma-separated list of buyers who can use this profile. This column works in conjunction with the Buyer IDs setting. The following describes the format of the “Buyer” column header.
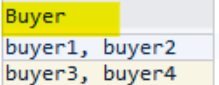
- Buyer : example input in this field would be buyer1, buyer2
The example below is what the buyer column should look like in your profile CSV.
Proxies
The “Proxy” column allows you to directly associate proxies with specific profiles. This feature can be especially useful if you want to consistently use the same proxy(s) for particular profiles without having to select them from your proxy CSV. Additionally, when a proxy is added to a profile, it is automatically enabled when that profile is selected. The following describes the format of the “Proxy” column in the profile CSV.
- Proxy : The format of the proxy must be either
<host:port:username:password>or<host:port>.
- An example of this would be
79.199.53.21:6464:jancy1:pass123or79.199.53.21:6464
The example below is what the proxy column should look like in your profile CSV.

You can include multiple “Proxy” columns if needed. To differentiate between them, simply change the text following “Proxy”. The order of the proxies in Jancy is based on thier position in the file, Jancy reads the fields from left to right. In the profile panel, you will see the current proxy and also which proxy in the list you are viewing. To cycle to the next proxy, run the command “Skip proxy in selected tabs”.

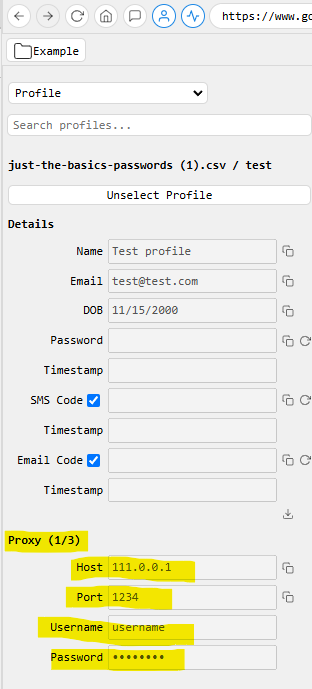
The following snapshot will show where the proxy will be displayed on the profile panel.
Using the phrase “system connection” in this column will create a proxy that uses your system’s connection. If you have any questions about this please reach out to us at contact@jancy.io
Proxy Resolver
The “Proxy Resolver” column allows you to associate a proxy resolver to a profile. Proxy resolvers allow Jancy to retrieve the proxy to use for a profile when it’s selected into a tab. The typical use case for a proxy resolver is if the proxy for the profile can be retrieved from a 3rd party via some API.
- Proxy Resolver

If a proxy resolver and a proxy are both defined for a profile, the proxy resolver will be attempted first. If a proxy cannot be resolved, the proxy defined for the profile will be used.
Notes
Profile notes are profile specific notes that will be availible on the profile panel. While there’s no character limit for this field, the panel size is limited, so consider keeping your notes brief. The following decribes the format for “Notes” in the profile CSV.
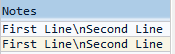
- Notes : You move text to a different line by adding \n where you would like to start a new line. The example below will show how this is used.
The example below is what the Notes column should look like in your profile CSV.
The following snapshot will show where the Notes will be displayed on the profile panel.
URL
The “URL” column allows you to associate a custom URL to a profile.
- URL
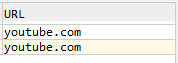
There are commands in Jancy that let you change the URL of the tab to the URL assigned to the profile.
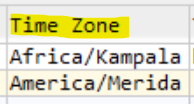
Time Zone
The “Time Zone” column lets you assign a time zone to your profiles. The time zone set will be used when a profile is selected into a tab. You can find the complete and valid list of time zones here
- Time Zone
Favorite
The “Favorite” column allows you to mark a profile as a favorite.
- *Favorite**: There are 2 possible values that can be entered in this field.
- 0 means don’t mark the profile as a favorite
- 1 means mark the profile as a favorite
Any other value or an empty value will not mark the profile as a favorite.
Credit Card Information
Credit cards are optional for a profile; you can assign zero or more credit cards to it. A single credit card is defined by two required columns and up to six optional ones. Each credit card needs to have a unique set name. The two required columns for a credit card are the credit card number and the CVV.
A credit card type (Visa, MC, Amex, Discover) will be automatically assigned to each card based on the credit card number. If a type cannot be determined, the card will be assigned the type “Unknown”.
The following is a list of credit card information that can be added to your CSV, along with the format they should be in.
Credit Card Number
- CC Number:< set name > : This field represents the credit card number. This is a required field if you are adding a credit card. An example CC Number header would look like the following.
- CC Number:Test1
It is not required to enter a full credit card number in this field. You can format it as you wish; for example, you could include just the last four digits, the CVC, and the expiration date.
Credit Card CVV
- CC CVV:< set name > : This field represents the credit card CVV. This is also a required field if you are adding a credit card. An example CC CVV header would look like the following.
- CC CVV:Test1
Credit Card Expiration Date
- CC Exp Date:< set name > : This field represents the expiration date for the credit card. This is an optional field if you are adding a credit card. An example CC Exp Date header would look like the following.
- CC Exp Date:Test1
- The format of the expiration date is MM/YY (e.g 08/24).
Credit Card Name
- CC Name:< set name > : This field represents the name on the credit card. This is an optional field if you are adding a credit card. An example CC Name header would look like the following.
- CC Name:Test1
Credit Card Address Line 1
- CC Address:< set name > : This field represent the street address line #1 for the credit card. This is an optional field if you are adding a credit card. An example of a CC address header would look like the following.
- CC Address:Test1
Credit Card Address Line 2
- CC Address2:< set name > : This field represents the street address line #2 for the credit card. This is an optional field if you are adding a credit card. An example CC Address2 header would look like the following.
- CC Address2:Test1
Credit Card City
- CC City:< set name > : This field represents the city for the credit card. This is an optional field if you are adding a credit card. An example CC City header would look like the following.
- CC City:Test1
Credit Card State
- CC State:< set name > : This field represents the state for the credit card. This is an optional field if you are adding a credit card. An example CC State header would look like the following
- CC State:Test1
Credit Card Zip
- CC Zip:< set name > : This field represents the zip code for the credit card. This is an optional field if you are adding a credit card. An example CC Zip would look like the following.
- CC Zip:Test1
Credit Card Note
- CC Note:< set name > : This field represents a note for the credit card. This is an optional field if you are adding a credit card. An example CC Note would look like the following.
- CC Note:Test1
The example below is what all of the credit card columns should look like in your profile CSV.

The following snapshot will show where the credit card information will be displayed on the profile panel.