Profile Icon
![]()
The highlighted symbol in the image above represents profiles. This icon can be used to toggle the profile bar, which will appear on the left side of the window. The profile panel can also be toggled with the default key bind of ctrl+shift+p (command+shift+p on MacOS). In this window, you can select a profile to be displayed on the tab after a profile provider has been added in your profile settings.
- Documentation on how to add a profile provider can be here.
Profile Panel
After clicking on the profiles icon in the Jancy web browser, the profile panel opens in the tab panel on the left hand side of the screen, as shown in the picture below. In the highlighted field that says “Search profiles,” you can search for different profiles. You can search profiles by name, group, and email address.
![]()
Jancy will show you a configurable number of profiles that match your search criteria allowing you to select the profile you’re interested in.
Profile Details
After selecting the profile, the information that you have filled into your profile CSV will be displayed in the profile panel(as shown below). For example, in my sample profile CSV, I have included all the required information such as profile, name and email. Additionally, there is optional information available, including address, phone number, SMS number, and a credit card which I have named “Test 1”.
If you have added a proxy to a profile in your profile CSV, there is also a section for that. However, in my case, I do not have a proxy added to my profile provider.
Documentation on adding proxies to profile CSV’s can be found here
![]()
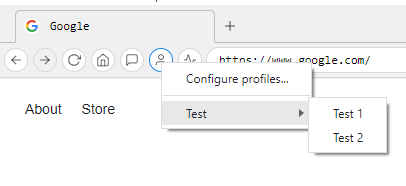
Profile Context Menu
The profile context menu can be accessed by right clicking on the Profile icon. All of the configured profile groups are displayed at the bottom of the menu.
Tab Context Menu
The tab context menu can be accessed by right-clicking on a tab. In this menu, you can use the ‘Set Profile’ feature to assign a profile to one or more tabs.
![]()
After selecting this feature, the ‘Set Profile’ dialogue box will open. Here, you can choose a profile for one or more tabs.
This feature does not open new tabs; it only assigns profiles to existing ones. To assign profiles to multiple tabs, you must first mass select tabs, then choose the profiles you want to set for them.
![]()
Mode
“stop when all profiles have been assigned” - This option will stop assigning profiles to tabs after all of the selected profiles have been assigned.
“Repeat profiles until all tabs have profiles assigned” - This option will continue assigning profiles to tabs until every tab has a profile assigned. When using this option, if you have more tabs than selected profiles, Jancy will repeat the selected profiles for the remaining tabs until all tabs have been assigned a profile.